

A Conie Fong bear coloured with Stampin' Up Watercolour Pencils surrounded by a gingham ribbon, such a cutie for a Valentine card.
Supplies


Challenges
Crafty Gals Corner: Add a Heart
Fab 'n' Funky: Use Ribbon
Simon Says Stamp Work It Wednesday: New Product
Creative Moments: Something New
Through the Craftroom Door: Anything Goes
Penny's Paper-crafty: Anything Goes
Fab 'n' Funky: Use Ribbon
Simon Says Stamp Work It Wednesday: New Product
Creative Moments: Something New
Through the Craftroom Door: Anything Goes
Penny's Paper-crafty: Anything Goes
Putting It Together
Once a month, I attend a local gather sponsored by my Stampin' Up demonstrator, Liane. Last Thursday she was showing off some of the new things from the catalogue (and Sale-a-bration). One of the new items she has is a set of Stampin' Up Watercolour Pencils. Since the night is usually an open 'crop' while chatting, I had brought a bunch of images (printed or stamped on watercolour cardstock) and my own collection of watercolour pencils (Staedler) and waterbrushes. I wanted to get a feel for the Stampin' Up pencils, and see how red the red is. I saw this little bear from Conie Fong in the image stash I brought and thought it would be a perfect 'trial'.
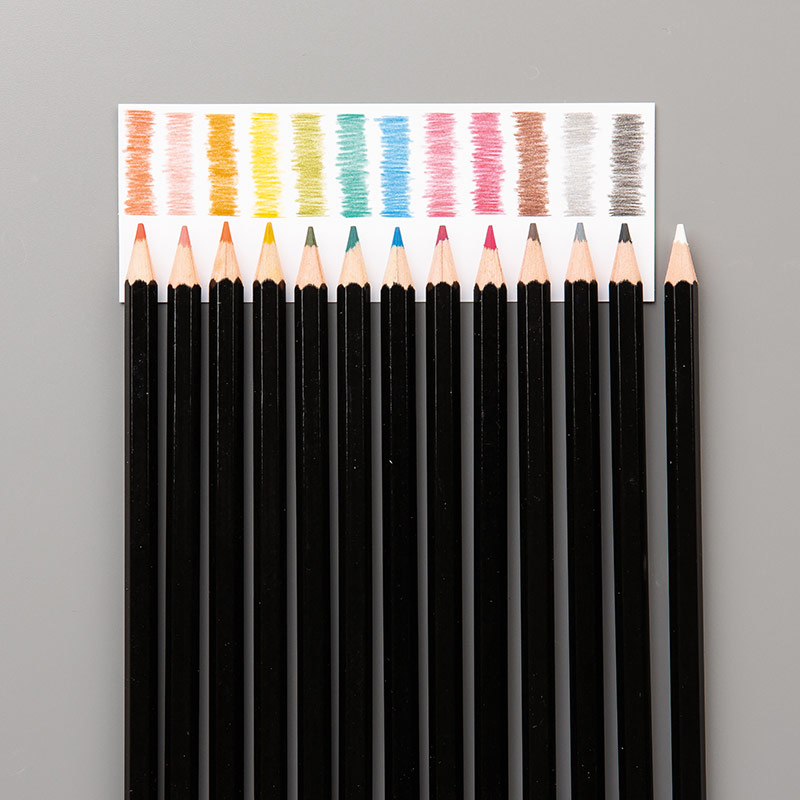
The pencils are a limited palette of 13 pencils ($16 USD, $21CAD) in Stampin’ Up! colors: Basic Black, Basic Gray, Bermuda Bay, Calypso Coral, Daffodil Delight, Early Espresso, Melon Mambo, Old Olive, Pacific Point, Pumpkin Pie, Real Red, Rich Razzleberry, Whisper White. In "creaminess" and blendability they're comparable to my Staedler pencils (which are, admittedly, quite old). The price point is, like for many Stampin' Up products, a bit high. But, they do match the Stampin' Up colours which makes them easier to "match" with other Stampin' Up stuff (of which I really don't have a lot). One big limitation in the set is a lack of dark and light of a same colour group (i.e. light blue and dark blue) making them less suitable for a broader range of colouring.
When colouring with watercolour pencils, I'll lightly scribble with the pencil and then blend the colour with a waterbrush to smoothly fill the area. I'll repeat that to build up colour or even mix two.
When colouring with watercolour pencils, I'll lightly scribble with the pencil and then blend the colour with a waterbrush to smoothly fill the area. I'll repeat that to build up colour or even mix two.

This adorable bear is a digital stamp from Conie Fong. I had printed it and sprayed it with hair spray to fix the ink. After leaving it to dry a bit (and the smell of the hair spray to wear off), I trimmed it to a small panel to put in my stash of "I'll get 'round to coloring these images". I chose it to try the pencils because of the heart box I could use to try the red.
I started with Real Red on the heart box. The red is more red than the reddest pencil in my Staedler set but is still a little pink unless applied very heavily. The pencil wasn't scratchy but did have a creaminess that was easily blendable with the water from the brush.
I used Dafodil Delight on the bear and then added Early Espresso over to have a softer tan that I could blend to darker for shadows. For her dress, I similarly mixed Pacific Point with Bemuda Bay. For the box ribbon and roses I used Melon Mambo and Rich Razzleberry.

I used a Spellbinders oval to die cut and 'matte' the bear. I also die cut the lacy oval from Flirty Flamingo thinking I would use it to frame the image. I added Wink of Stella to the box ribbon, Stickles Stardust to the polka dots, and a pink rhinestone from the Hero Arts August kit.

I wasn't really satisfied with the Flirty Flamingo frame for the bear. The colour worked, but it didn't have the right feel. In my stash I had this bit of ribbon I had gotten many months ago in a sample pack from The Ribbon Resource. When I got it, I didn't think I would ever find a use for it. I was wrong *laugh*. This pink gingham ruffle ribbon was a perfect match to the bear.
In my stash, too, I have a bit of retired DSP (Designer Series Paper - or just patterned paper) from my Stampin' Up demonstrator (when she was destashing she gave away several packs). I found this lovely blue on blue with a Shakespeare sonnet is just the right background for the bear.

I used a bit of tape runner on the ruffle and added foam mounting tape to the back of the bear panel to allow the ribbon a bit of space over the background.

I used Natural White to create a top fold A2 card base. I used a sentiment from Jar of Love which I embossed with Emerald Creek Sweet Valentine to finish the front.

Inside I stamped "You fill me with happiness" and two hearts from Jar of Love in a pale pink that my camera doesn't want to focus on. (Sorry for the blurry picture.)


As an aside: I didn't buy the pencils for now. The price on them is a bit steep since I don't have any of the Stampin' Up inks and a limited amount of their cardstock so I'm not matching to their products as much. I like a wider palette choice as well. But, for someone with a lot of Stampin' Up colour items and who doesn't do a lot of watercolour colouring, these are quite nice pencils.
What a wonderful tutorial. Very detailed. Thank you for sharing at Crafty Gals Corner Challenges. DT~Jana
ReplyDelete